No Knead Focaccia
(same magic dough as my buns, baked flat with olive oil and flaky salt)
This no knead focaccia is what happens when you take the same wet, sticky, four-hour dough from my no knead bread buns, skip the shaping into rolls, and instead pour it flat into an oiled pan, drown it in olive oil, dimple it like piano keys, and bake it golden. The result is a crackly, blistered top, an open and irregular crumb, and a bottom that fries in the pool of olive oil at the base of the pan. Five ingredients in the dough. No kneading. The hardest part is not eating half the tray before it cools.
Active
15
min
Proof
5
hours
Bake
25
min
Serves
8
pieces
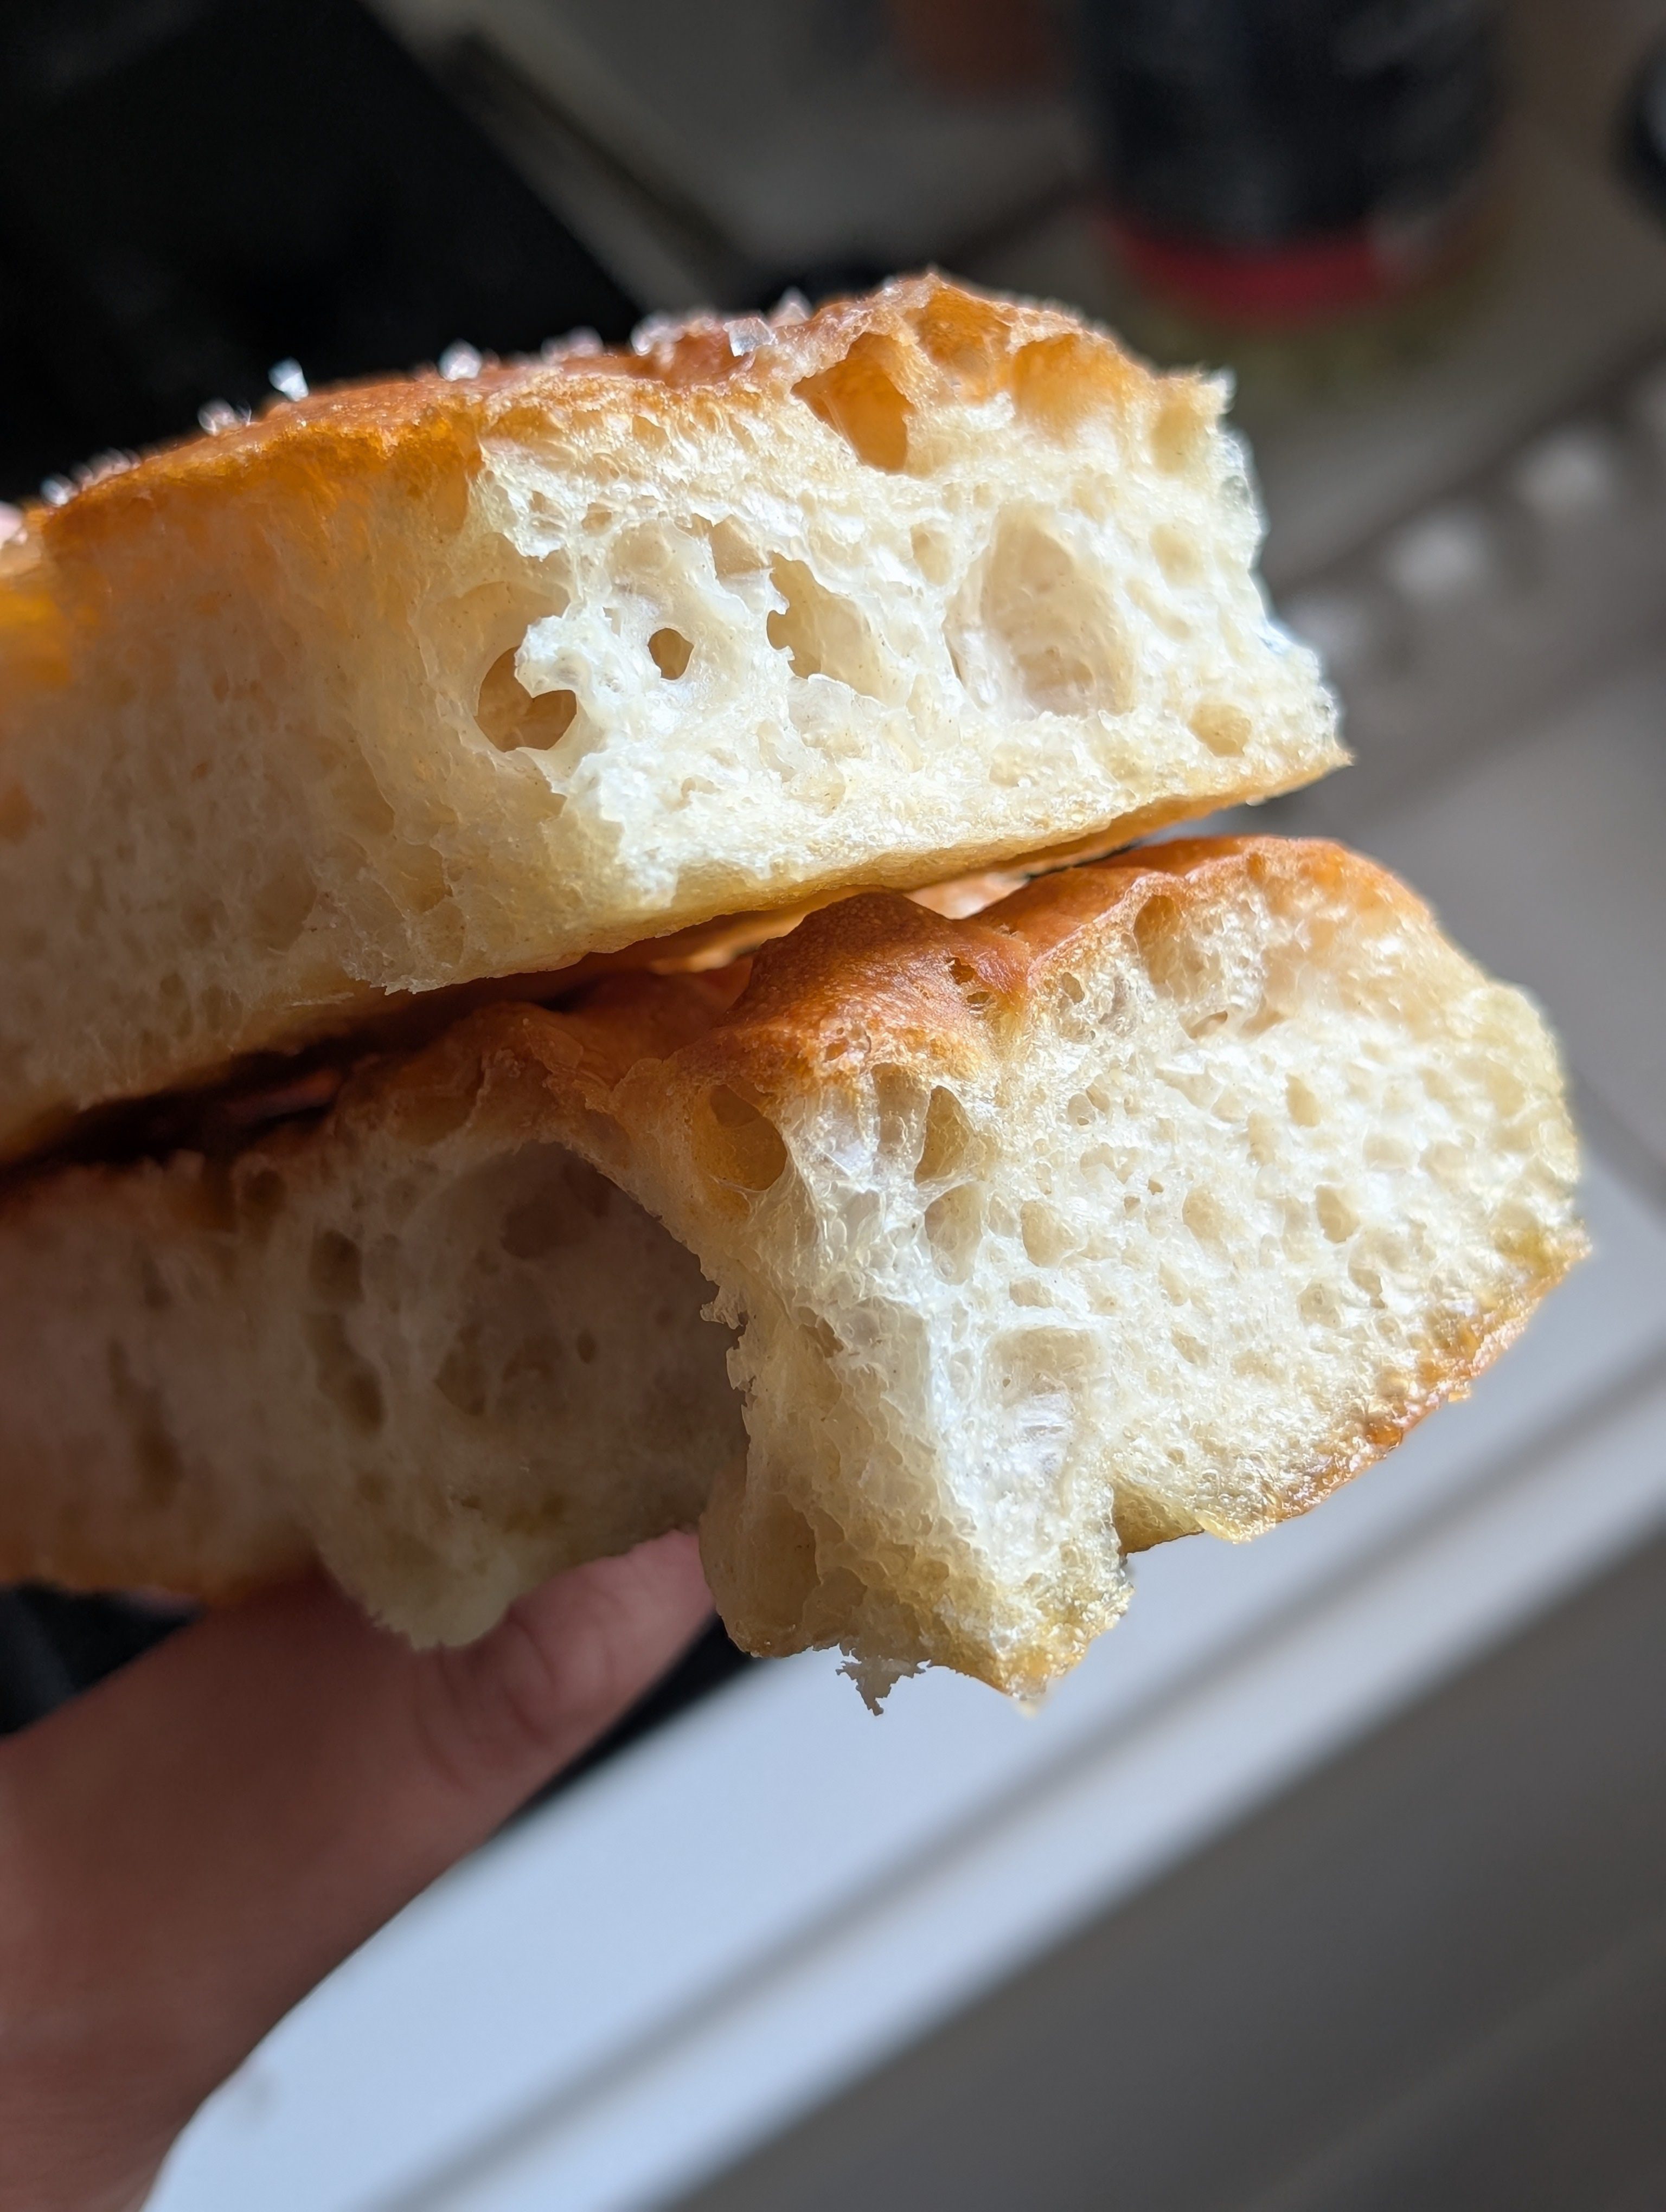
The crumb is what the four hours of stretch-and-fold buys you. Big, open, irregular, translucent.
Why This No Knead Focaccia Works
Real Italian focaccia is high-hydration dough. It is wetter than almost any bread you have ever made at home, often 75 to 80 percent water by weight of flour. That hydration is what gives you the open, blistered crumb that defines a good focaccia. The problem with high-hydration dough is that it is impossible to knead. Stick your hands in and it just glues to everything. This no knead focaccia solves that problem the same way the no knead bread buns do. Instead of kneading, you do four light stretch-and-fold sessions over four hours, with the dough doing the work between sets. By the time the four hours are up, the gluten network has built itself. The dough is alive with bubbles, soft and stretchy, and ready to be poured straight into a pan for a second short proof. Then olive oil. A lot of olive oil. And the dimples.Already made the buns?
The dough is literally identical. Same five ingredients, same ratios, same stretch-and-fold method, same four-hour bulk ferment. If you already know my no knead bread buns recipe, you can skim past the dough steps and jump straight to the pan-and-bake section.
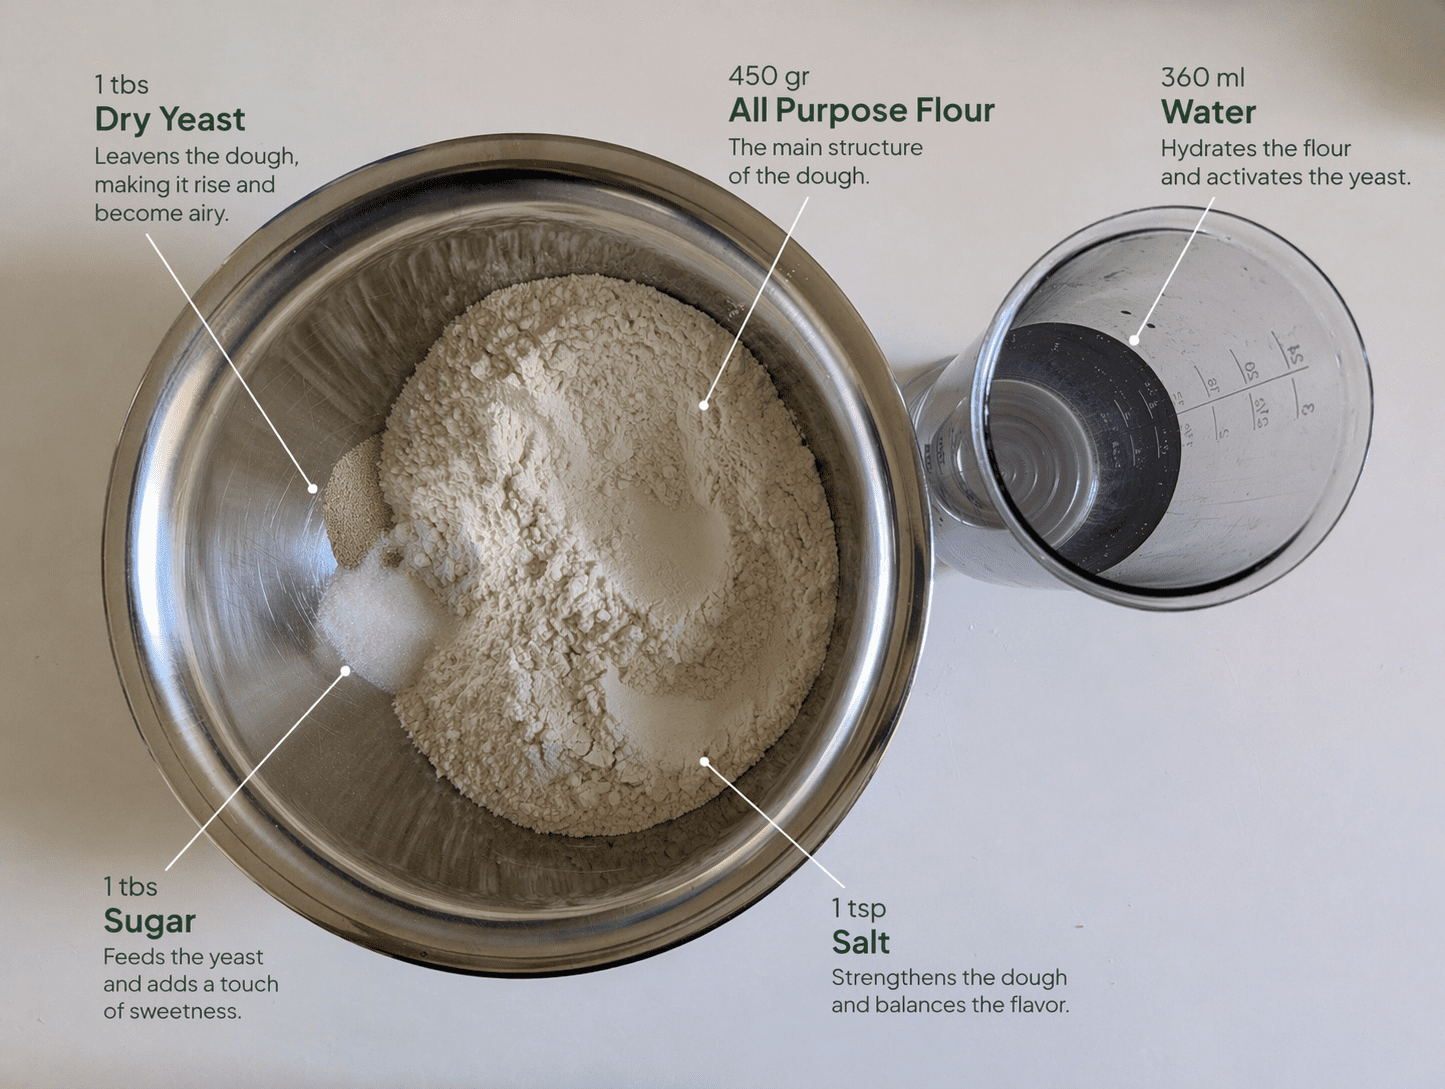
How to Make No Knead Focaccia, Step by Step
1
Mix the dough
- In a large bowl, combine the flour, yeast, sugar, and salt. Mix the dry ingredients first.
- Add the warm water and stir with a wooden spoon until everything comes together. The dough will look shaggy and rough. That is correct.
- With very wet hands, work the dough until it no longer feels grainy. It should be wet, sticky, and slightly slack, not smooth and dry.
- Cover the bowl with plastic wrap, write down the time, and set aside at room temperature.
Wet hands, not flour
This dough is intentionally sticky. Do not add more flour to make it easier to handle. Wet hands are the tool. A dry, easy-to-handle dough makes a tight, closed crumb. Wet, awkward dough makes the open crumb you see in the photos.
2
Stretch and fold (over 4 hours)
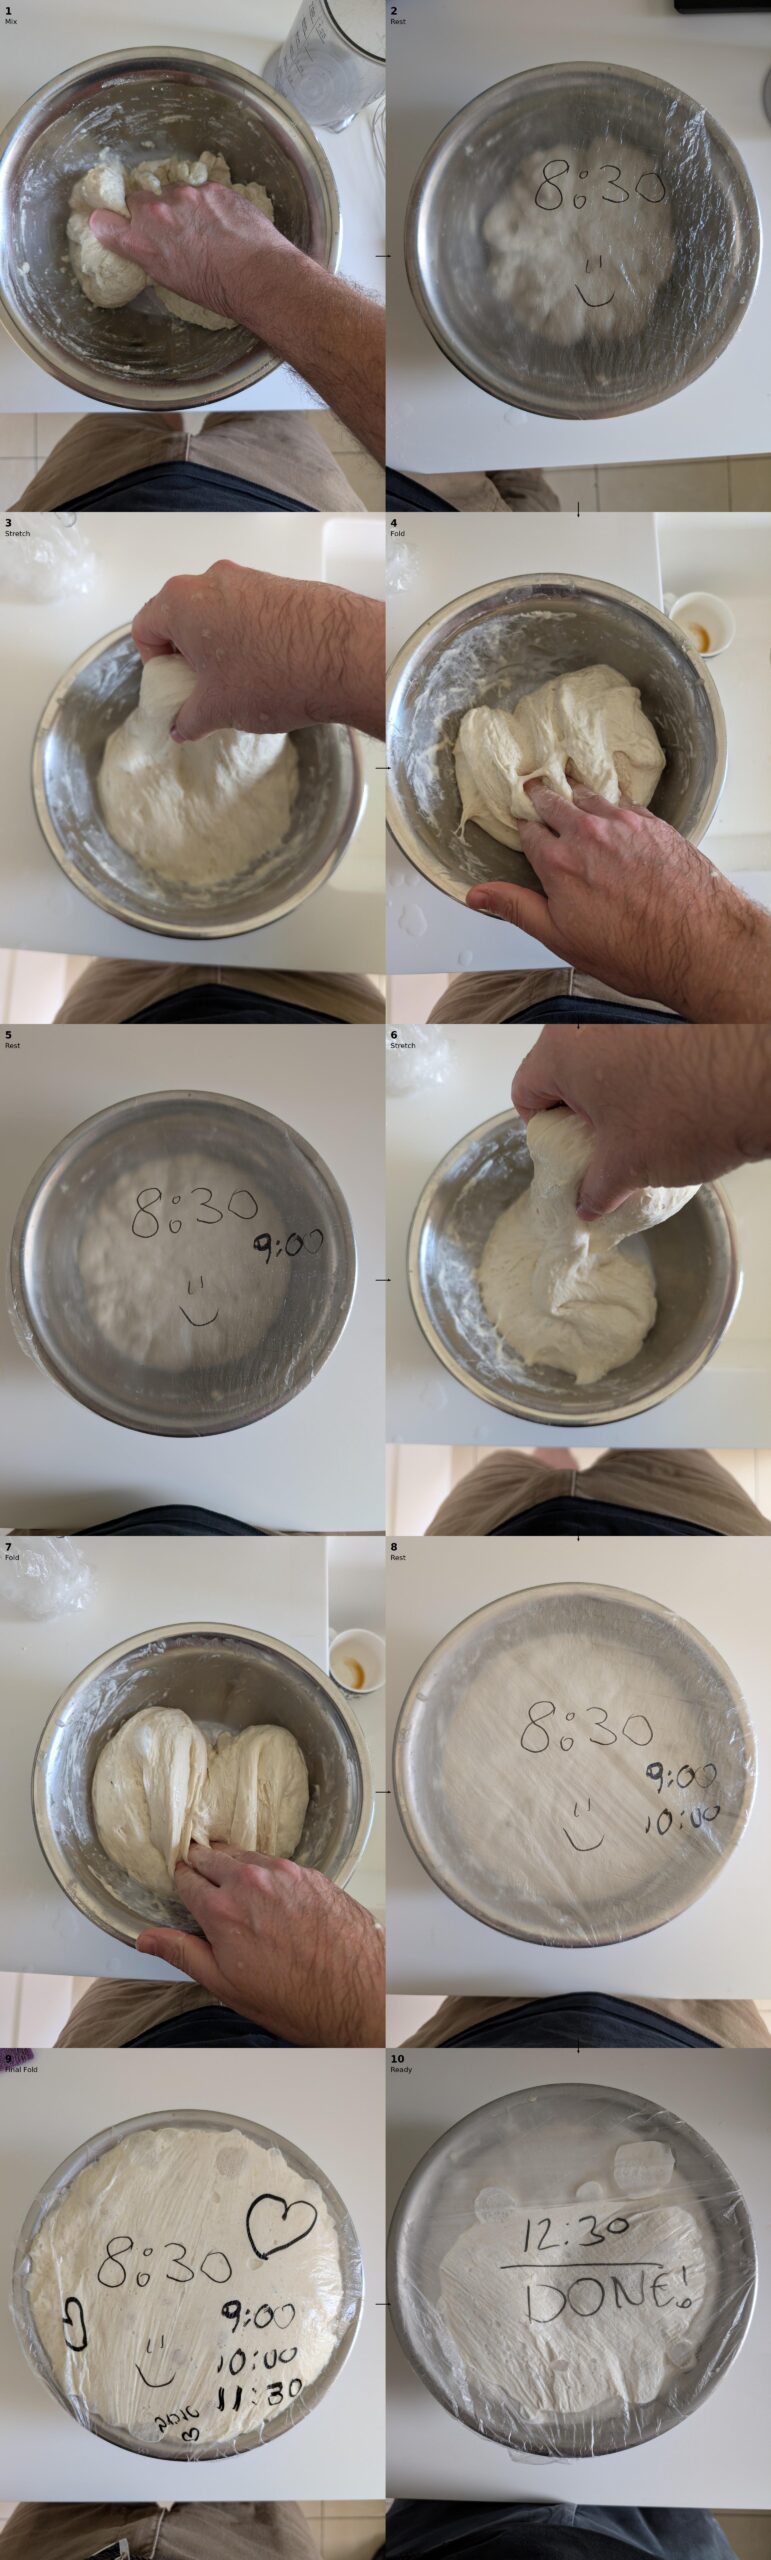
- Perform four stretch-and-fold sets at: 30 min, 1 hour, 2 hours, and 3 hours. Each set takes about 30 seconds.
- To stretch and fold: with a wet hand, reach under the dough, stretch it upward as far as it will go without tearing, then fold it back over itself. Rotate the bowl 90° and repeat. Four folds per set.
- Re-cover after each set and leave the dough alone until the next mark.
Stretch and Fold Schedule
30 min → 1 hr → 2 hr → 3 hr. At the 4-hour mark the dough is ready for the pan. Write the times on your plastic wrap so you don’t lose track.
3
Check the dough at 4 hours
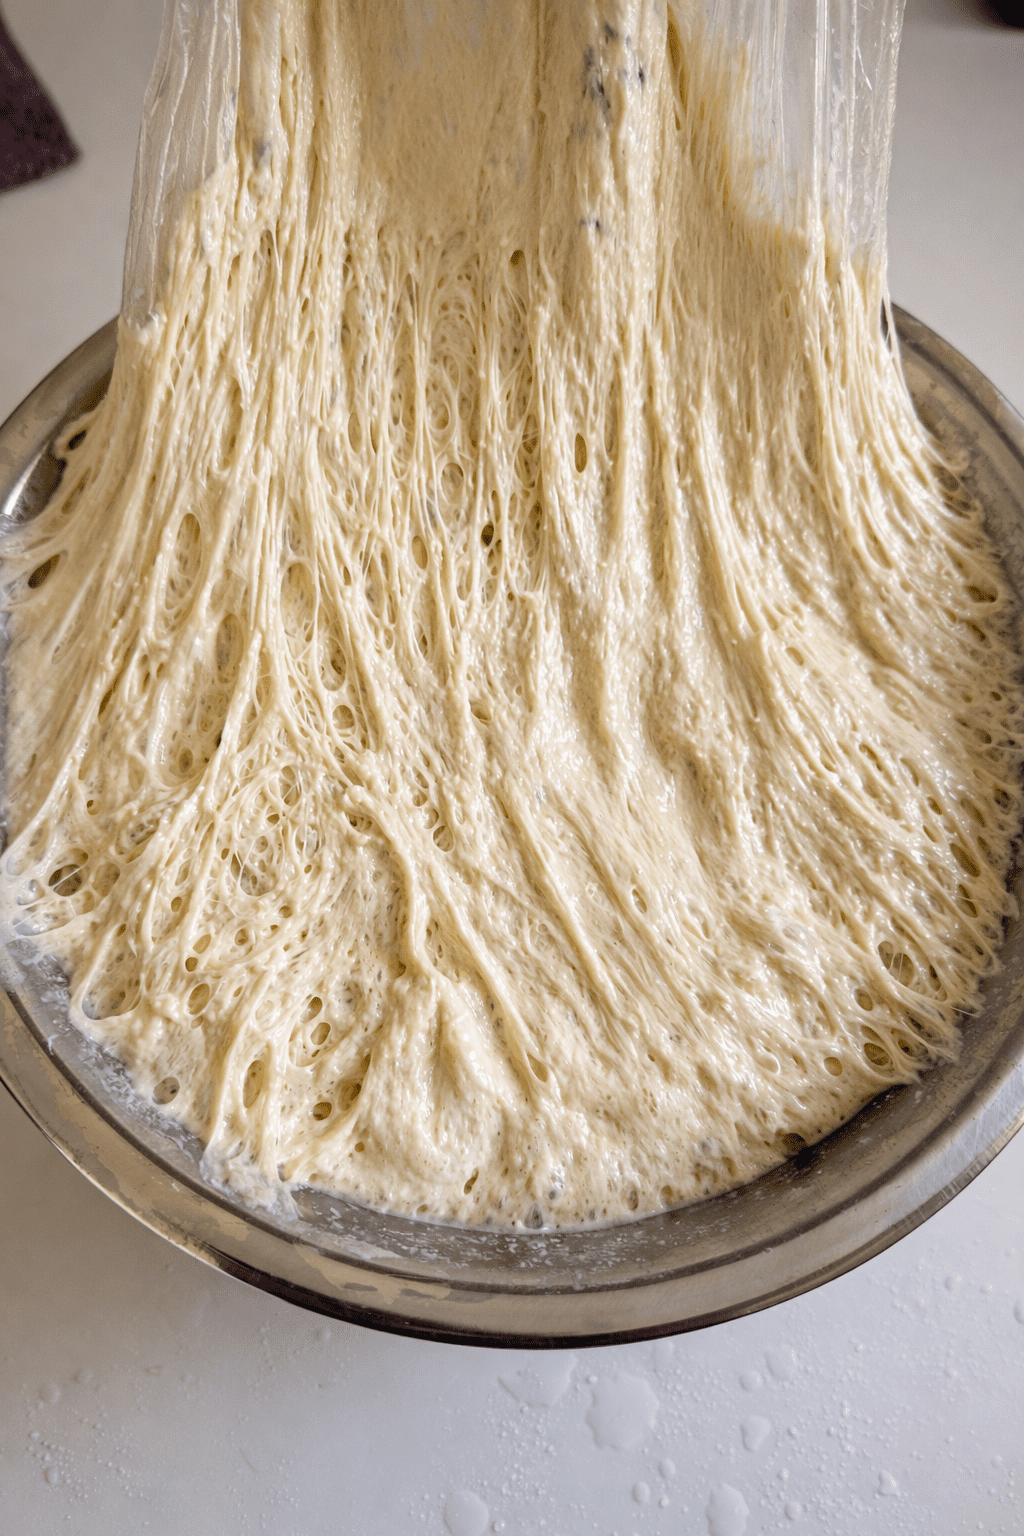
- The dough should have grown significantly and feel light, bubbly, and gassy.
- The real test: pull a small piece up gently. If you see long, elastic, translucent strands of gluten stretching out, that web-like structure, the dough is ready.
- If it still tears short and looks dense, give it another 30 minutes and check again.
4
Transfer to an oiled pan
- Line a 9×13 inch (or similar size) baking pan with parchment paper.
- Pour about 2 tablespoons of olive oil onto the parchment and rub it around to coat the bottom and edges. Be generous, the oil at the base of the pan is what fries the bottom of the focaccia into a golden crust.
- With wet hands, tip the dough out of the bowl directly onto the oiled parchment. Try to keep as much air in the dough as possible. Do not punch it down or knead it.
- Gently coax the dough toward the corners with your fingertips, but do not force it. It will not fill the pan yet. That happens during the second proof.
5
Second proof in the pan (45 min)
- Drizzle another tablespoon of olive oil over the top of the dough.
- Cover loosely with plastic wrap or a damp towel and let rest in a warm spot for 45 minutes to 1 hour.
- During this time, the dough will relax, spread out, and fill the pan. It will also rise a second time and develop more bubbles. Do not skip this step. It is what makes the focaccia tall and pillowy instead of dense and flat.
- While it proofs, preheat the oven to 220°C (425°F).
6
Dimple it
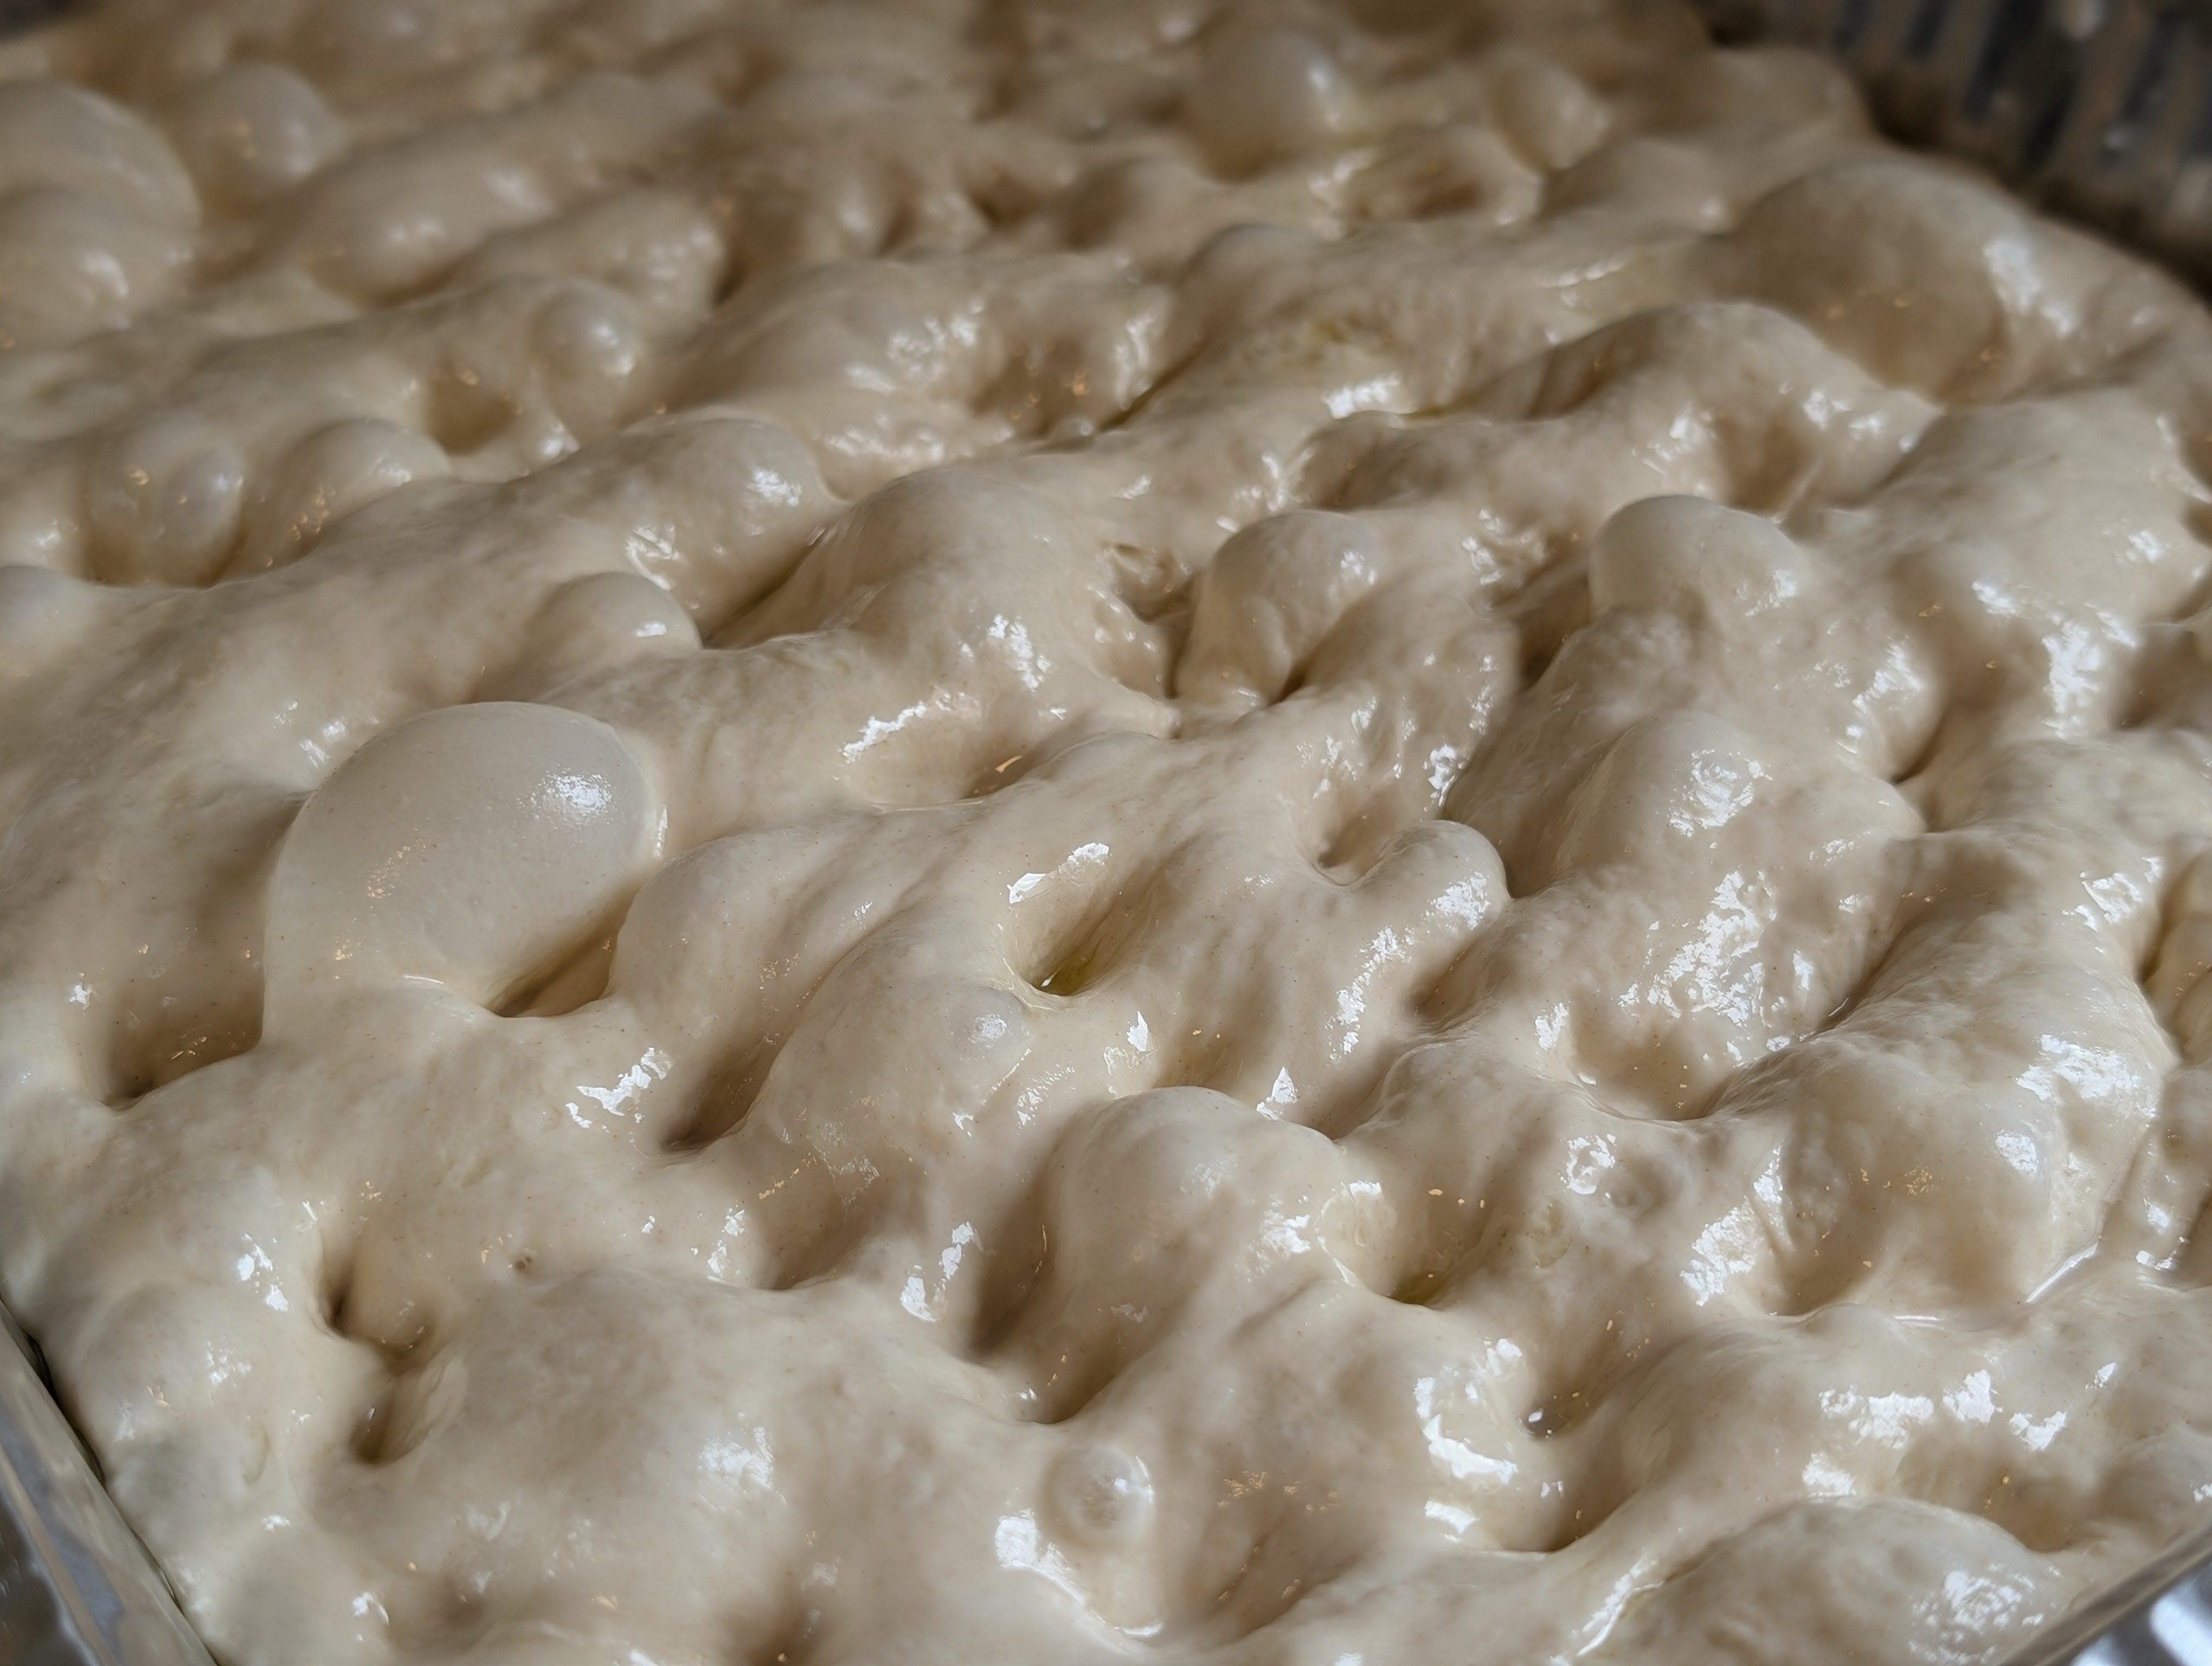
- Pour another generous glug of olive oil over the top of the proofed dough. Two tablespoons minimum. Do not be shy.
- With wet or oiled fingertips, press straight down into the dough all the way to the bottom of the pan. Work across the entire surface, making deep dimples spaced about an inch apart.
- The oil will pool in the dimples. That is exactly what you want. Those pools are what create the crackly, blistered top with the deep golden craters.
- Sprinkle generously with flaky sea salt. If using rosemary, scatter the leaves now.
More olive oil than you think
A truly great focaccia is almost shallow-fried from below by the olive oil pooled at the bottom of the pan. The top should look wet and glossy with oil before it goes in the oven. If you can see dry patches, drizzle more. This is not the recipe to economize on olive oil.
7
Bake until deep golden
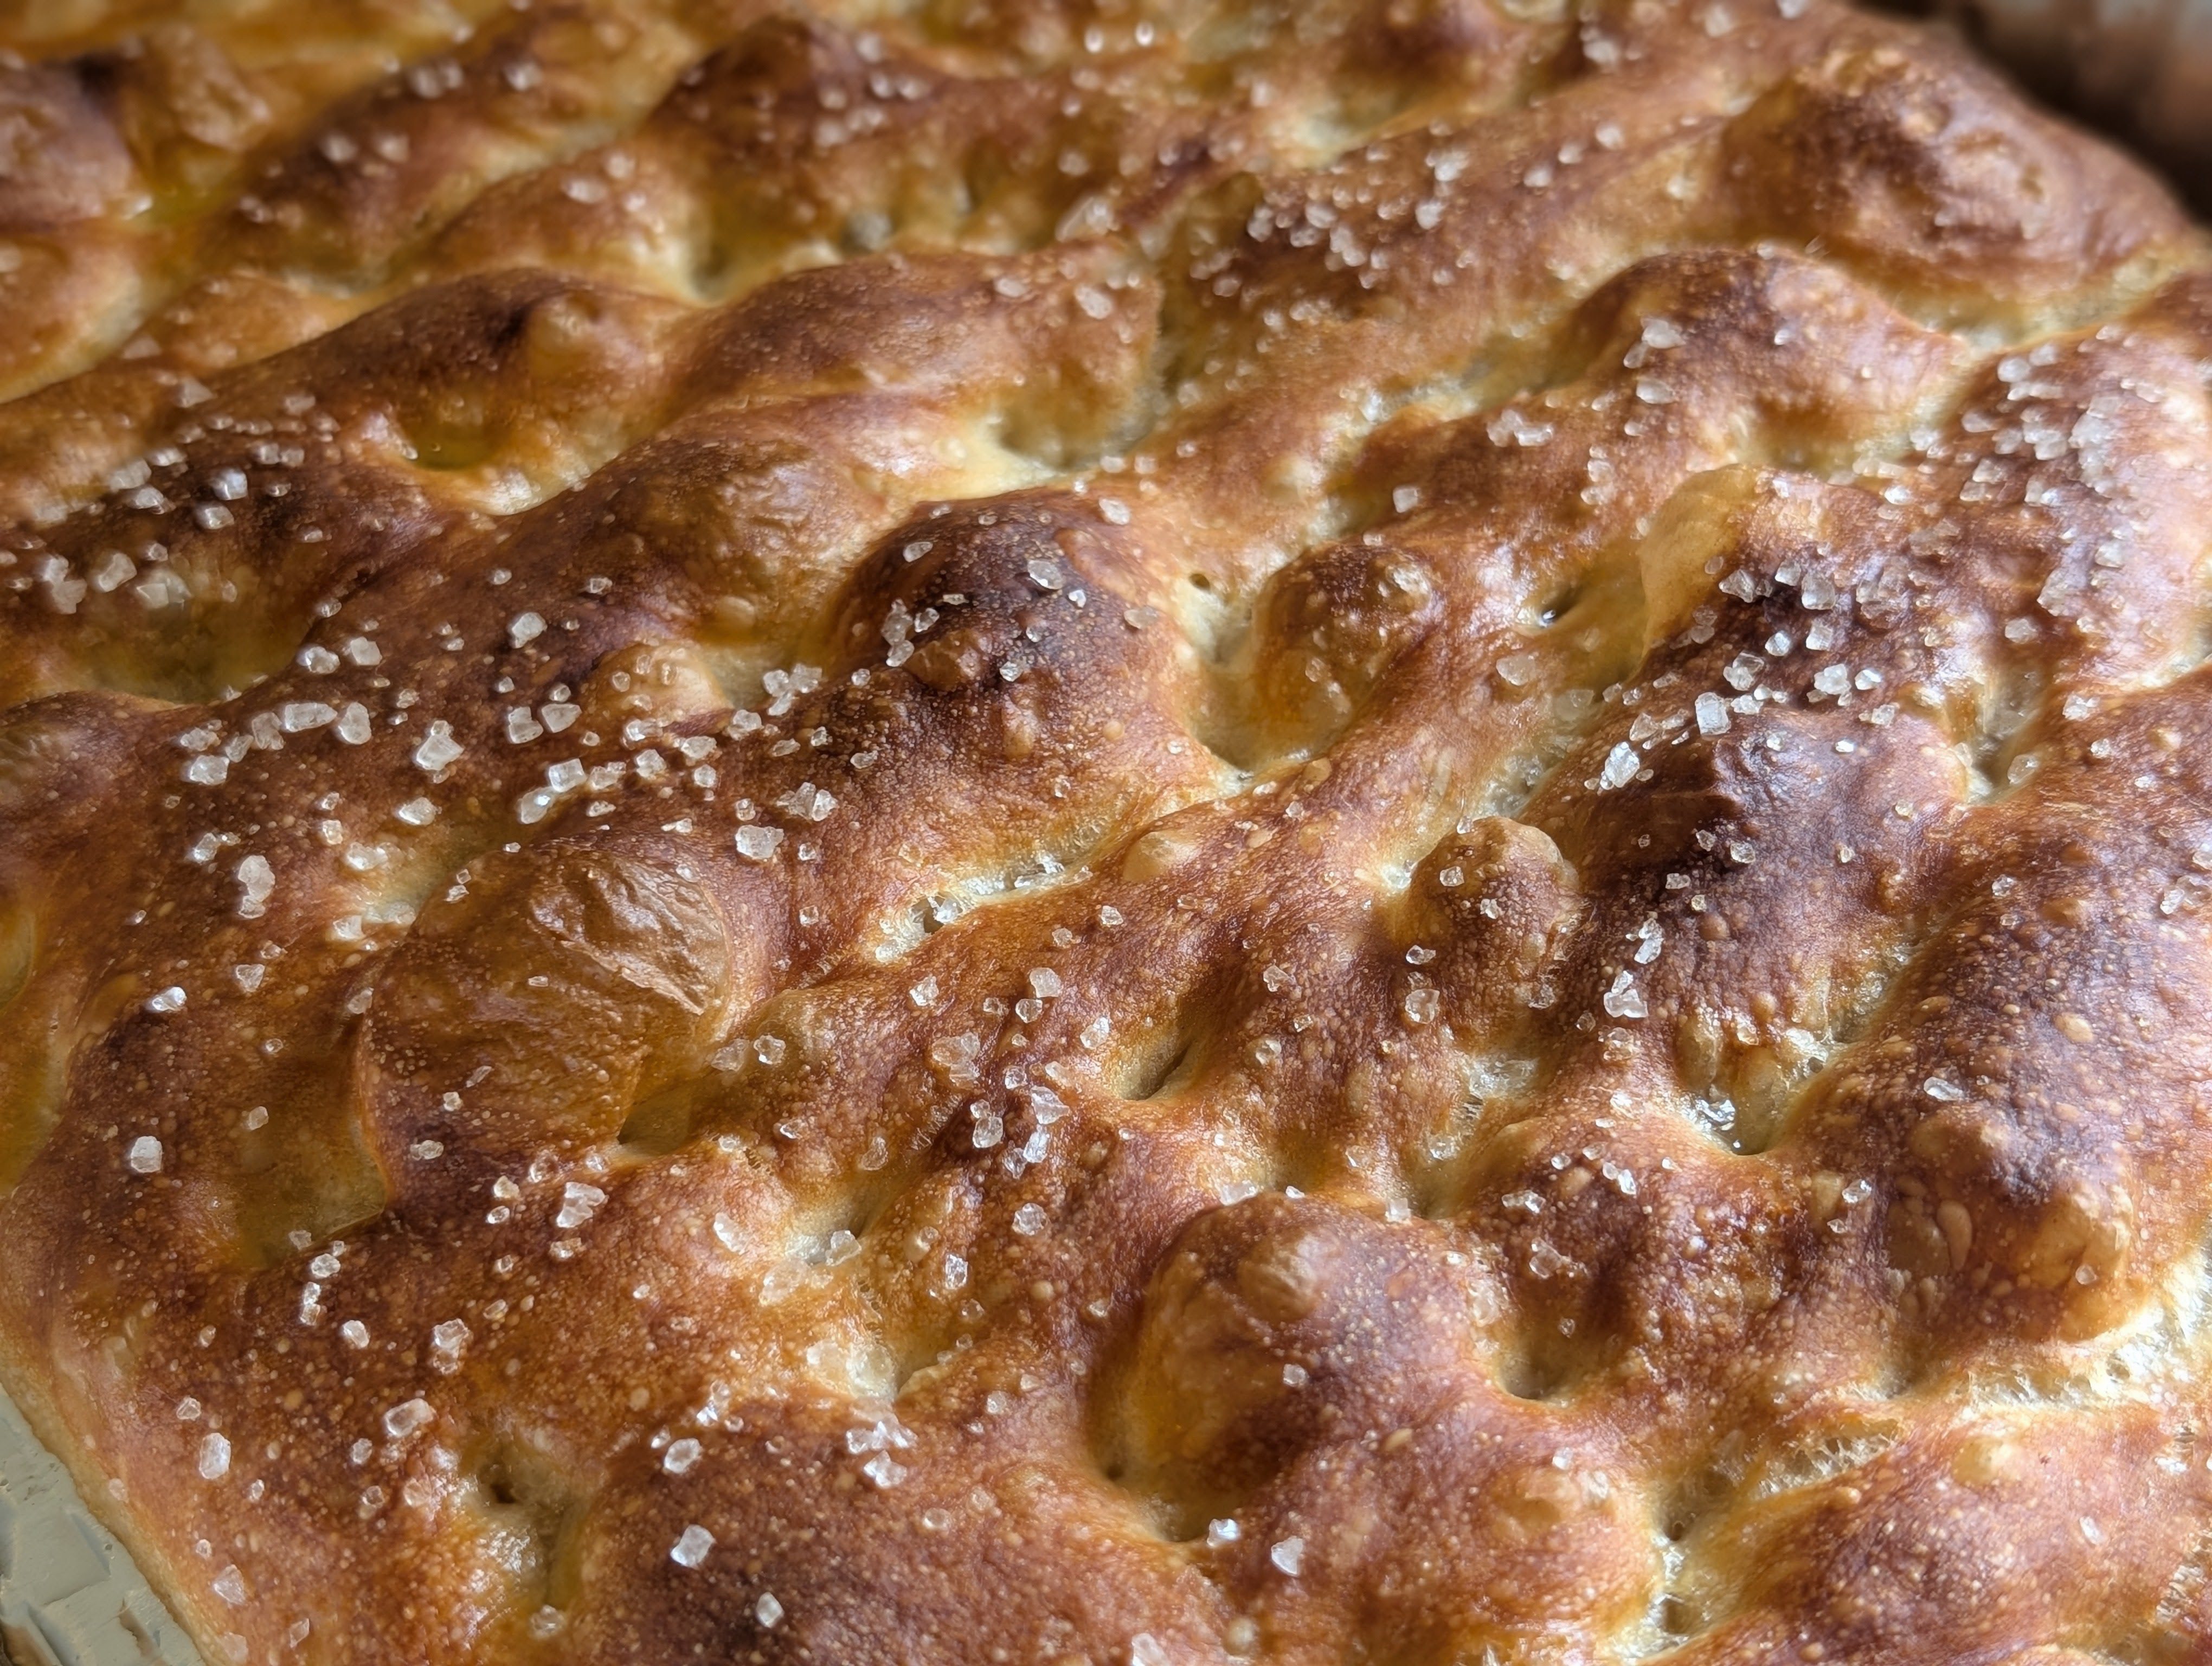
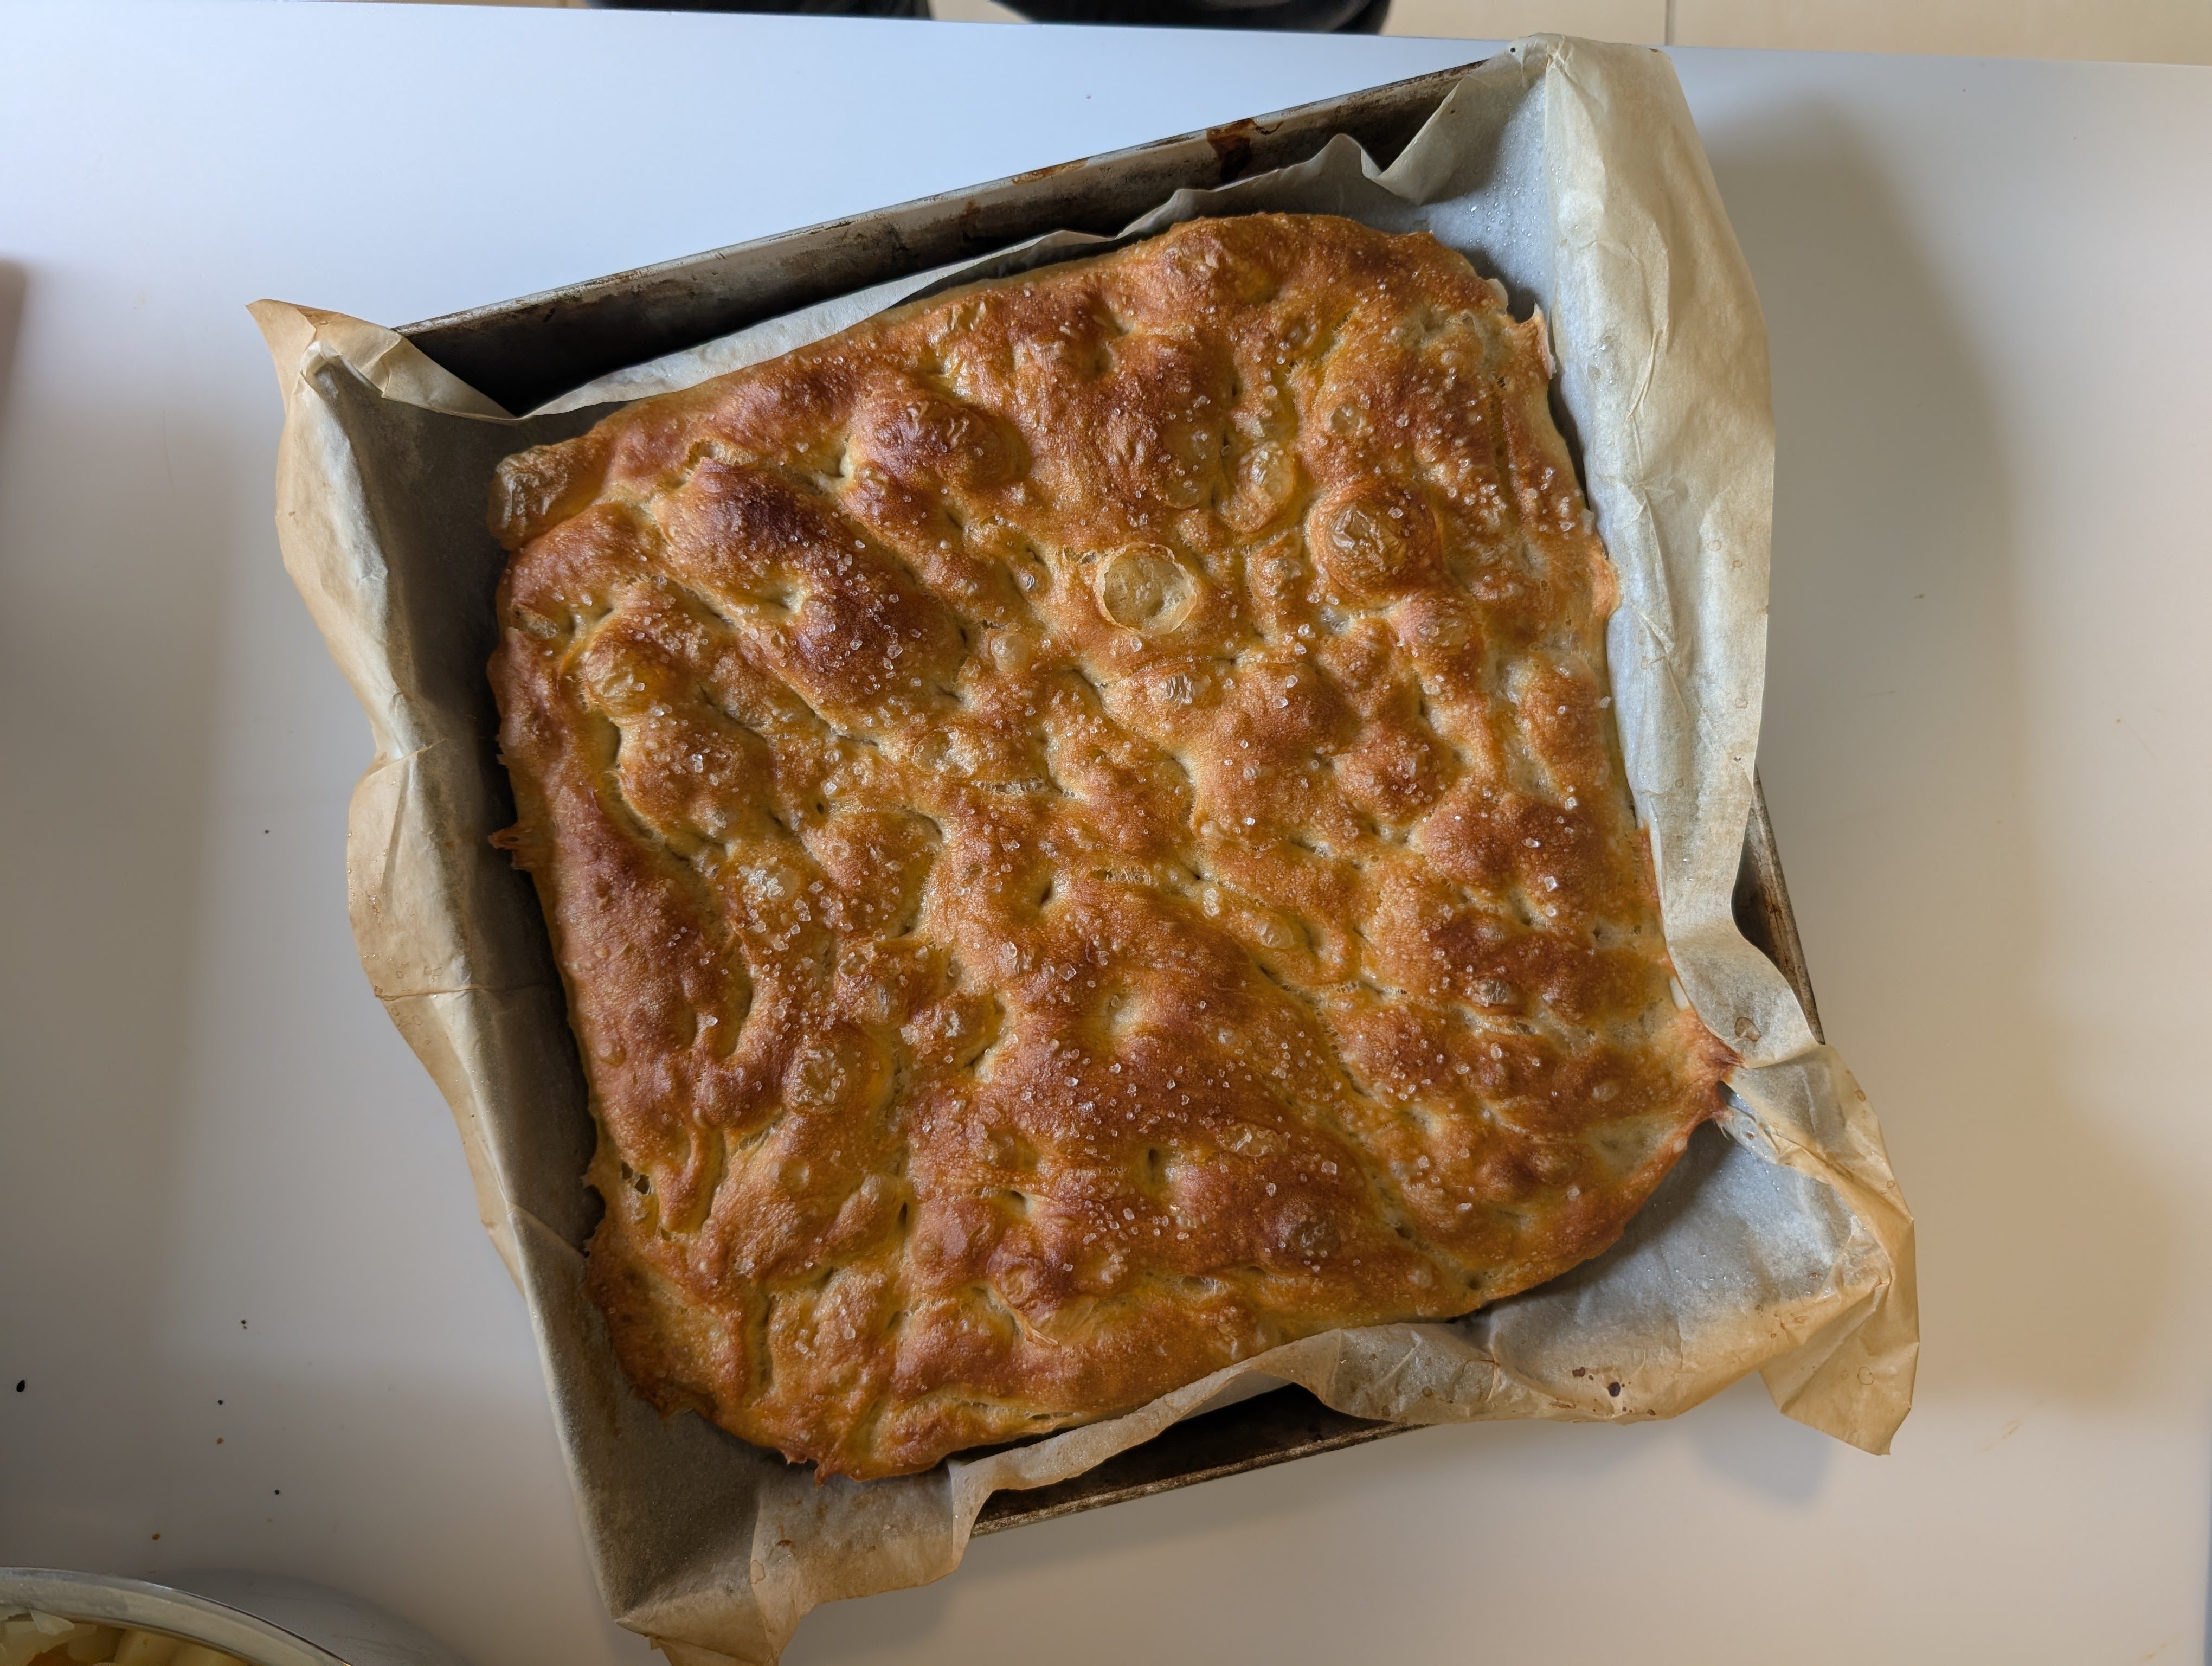
- Bake at 220°C (425°F) for 25 to 30 minutes.
- The top should be deeply golden brown, with darker patches where the dimples are deepest. If the top looks pale at 25 minutes, leave it in. Light focaccia is undercooked focaccia.
- The bottom should be crispy and golden. You can lift one corner with a spatula to check.
- Slide the focaccia out of the pan and onto a cooling rack as soon as it comes out. If you leave it in the pan, the bottom will steam itself soggy.
How to Serve It
Focaccia is at its absolute best within an hour of coming out of the oven, eaten warm and torn with your hands. Beyond that, the classic Italian move is to slice it horizontally and use it as the bread for a sandwich, particularly with prosciutto, mozzarella, tomato, and basil. It is also incredible dunked in soup, served alongside a salad, or simply dipped in good olive oil and balsamic vinegar. For a Middle Eastern angle, tear off pieces and use them to scoop hummus or shakshuka. There are very few wrong moves.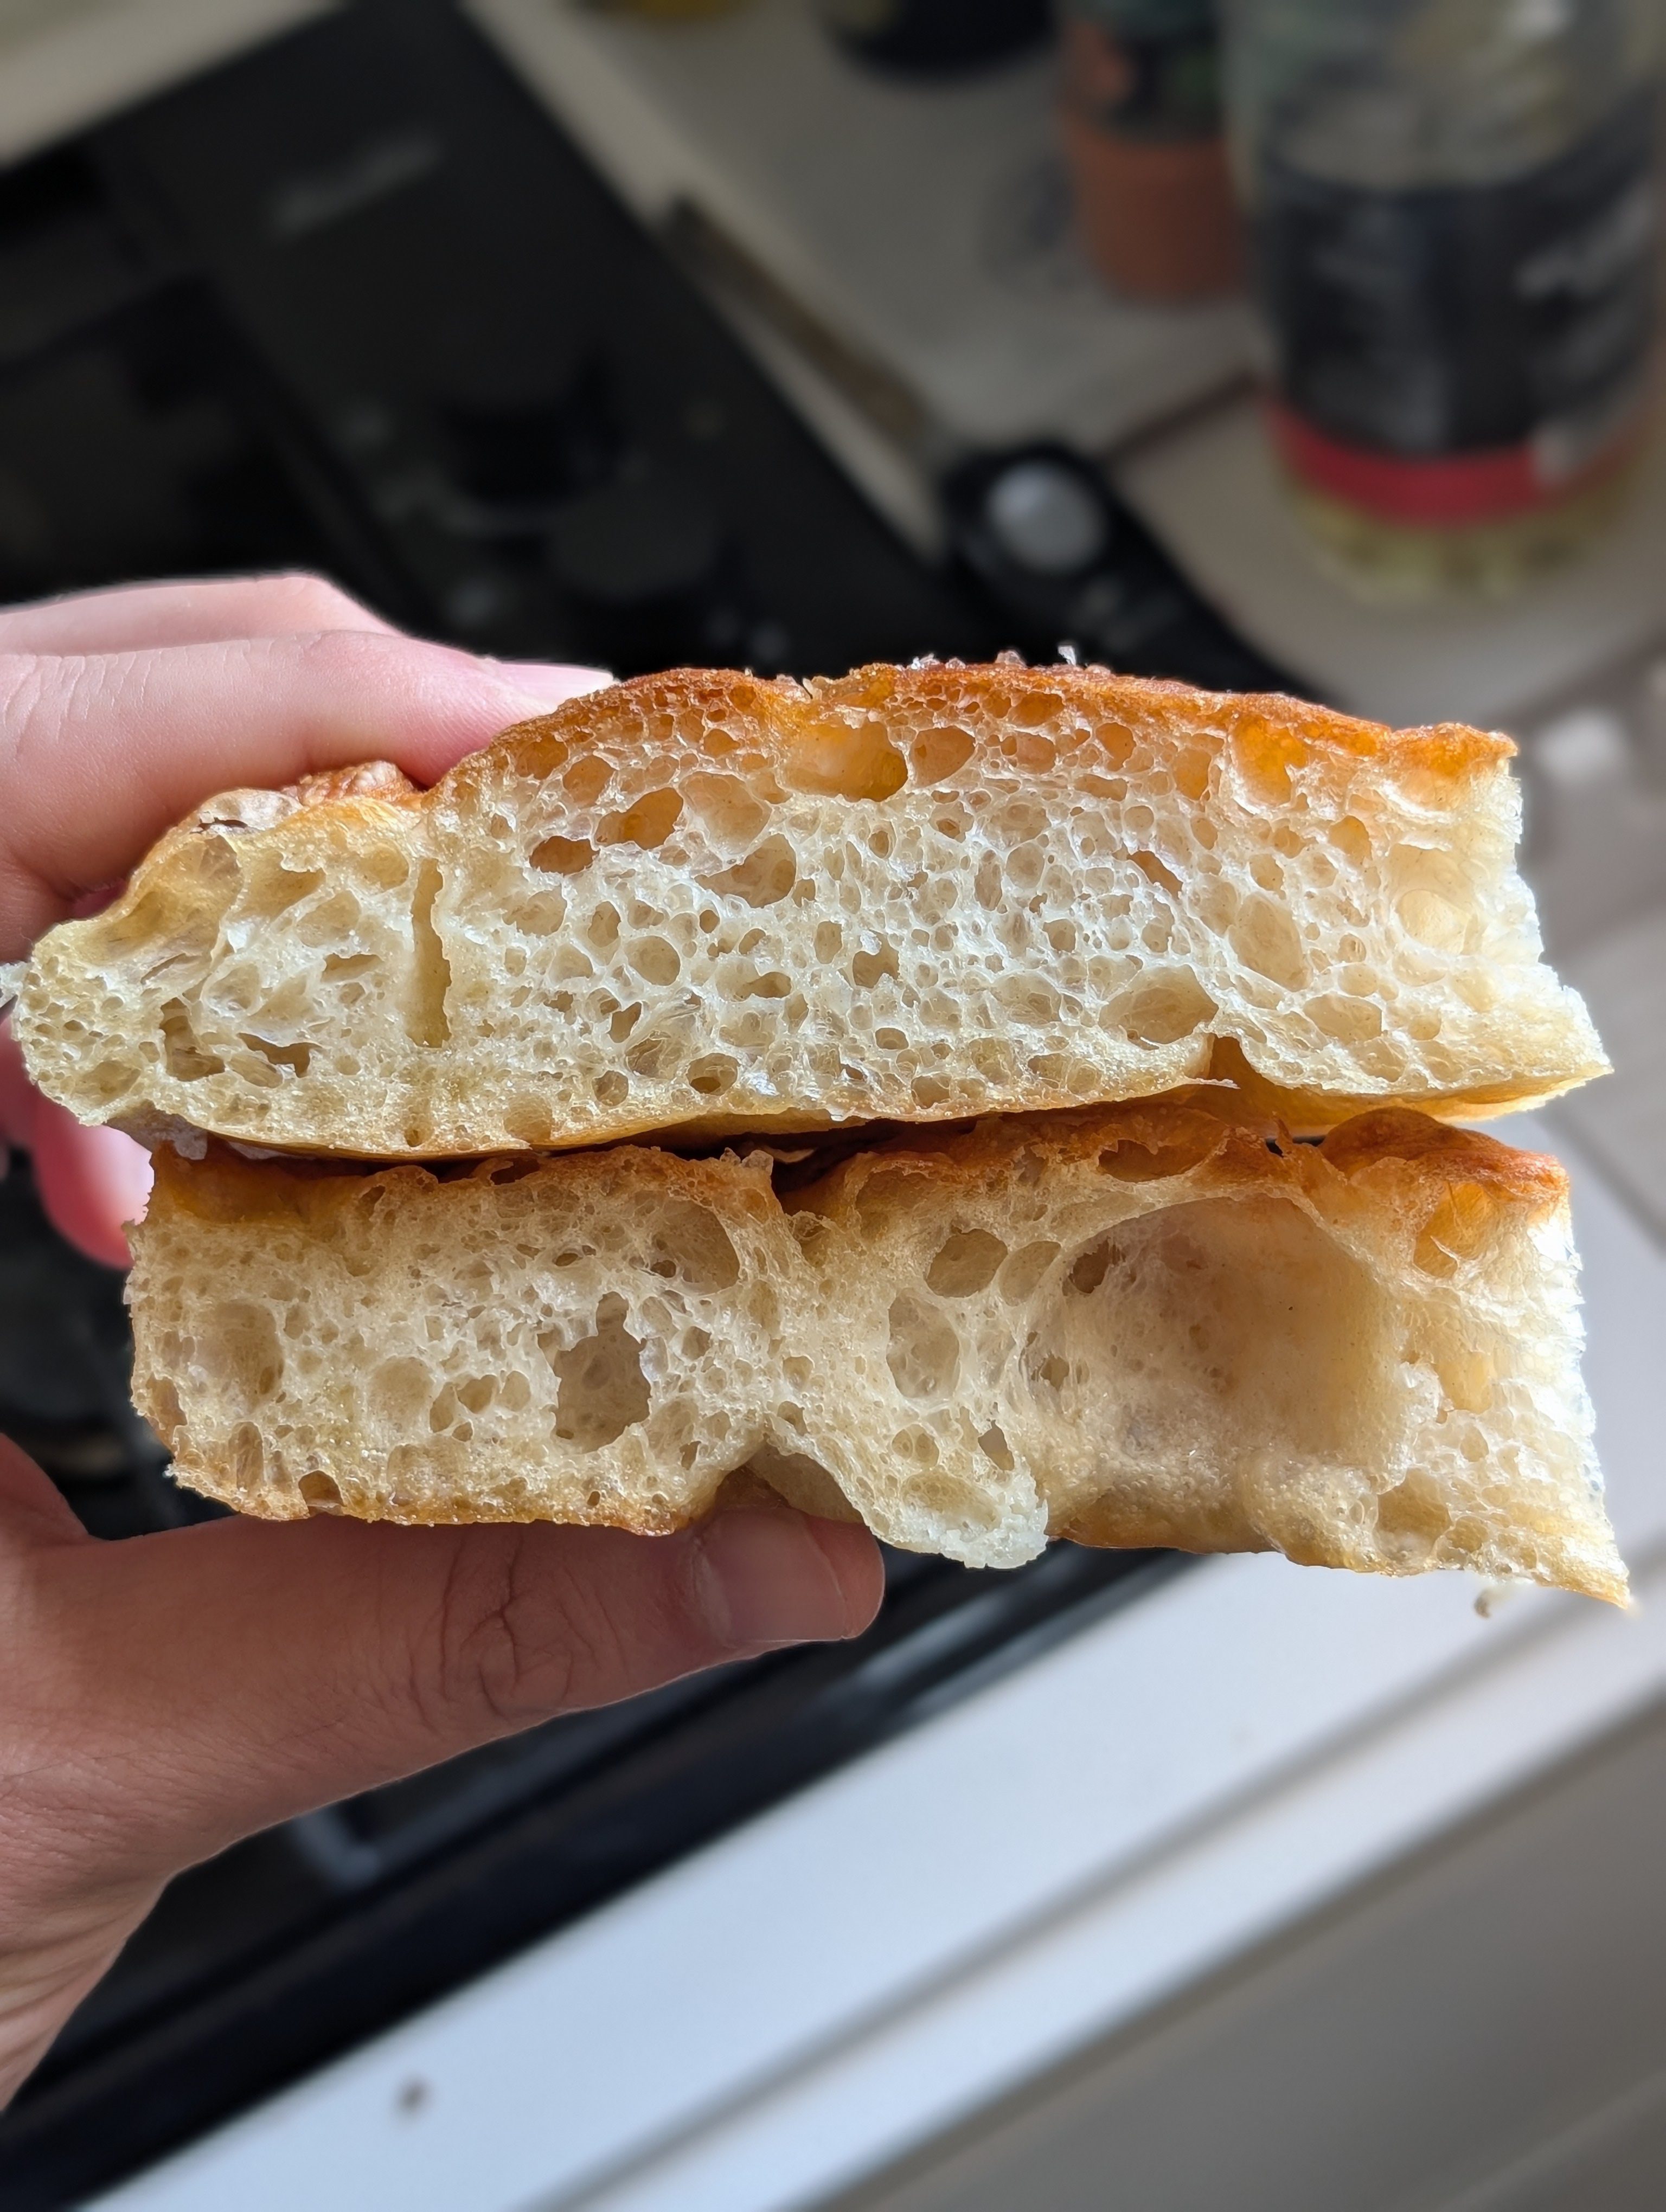
Tips for the Best No Knead Focaccia
- 🫒 Be generous with olive oil. Every great focaccia recipe makes you flinch at how much olive oil it calls for, and this is no exception. You need it in the pan, on top of the dough before dimpling, and pooling in the holes. Cheap olive oil works, but if you want it to taste Italian, use a decent extra-virgin.
- 💧 Do not skimp on hydration. The wet, slack dough is what creates the open crumb. If you find yourself wanting to add flour because the dough is too sticky, just wet your hands more instead.
- ⏰ Plan the timing backwards. The dough takes 4 hours to bulk ferment plus 45 minutes for the second proof in the pan. Add the bake and the cool-down, and you are looking at 5.5 to 6 hours from start to slice. Start in the morning for an evening focaccia, or after lunch for a late dinner.
- 🌡️ Hot oven, not warm oven. 220°C (425°F) is the minimum. Lower than that and the focaccia steams instead of browning. Many Italian bakers go higher, up to 240°C, for a darker crust. Watch the top closely after 20 minutes.
- 🥄 Dimple all the way through. Half-hearted little dents in the top do not work. Push your fingers all the way down to the bottom of the pan. The deep dimples are what hold the olive oil and create the signature blistered look.
- 🍞 Eat it fresh. Focaccia is at its peak within an hour of baking. It is still good the next day, but never as good. If you have leftovers, reheat in a hot oven for 5 minutes to bring back the crust.
- 🌿 Toppings beyond rosemary. Cherry tomatoes pressed cut-side down into the dimples, thinly sliced red onion, pitted olives, caramelized onions, thinly sliced potato with rosemary. Toppings go on after dimpling, before baking. Anything goes, but keep it light so the focaccia stays the star.
Frequently Asked Questions
The dough is identical. Same five ingredients, same ratios, same four-hour bulk ferment with four stretch-and-fold sets. The difference is what happens after the dough is ready. The no knead bread buns get divided into 8 pieces, shaped, and baked as individual rolls with a steam tray for a soft crust. This focaccia gets poured flat into an oiled pan, given a second proof to fill the pan, drowned in olive oil, dimpled, and baked uncovered for a crackly, blistered top.
A standard 9×13 inch (23×33 cm) rectangular baking pan is ideal for this batch. A smaller pan will give you a taller, breadier focaccia. A larger pan will give you a thinner, crispier one. Anything from 9×9 to half-sheet (13×18) will work. Just keep the dough thickness somewhere between ¾ inch and 1½ inches before the second proof. As long as it has a rim to hold the olive oil, the exact size is flexible.
Yes, and this is actually how many serious focaccia bakers do it. After mixing, cover the bowl tightly and refrigerate overnight (8 to 24 hours). The cold ferment develops a deeper, more complex flavour, the kind that tastes vaguely sourdough-ish without using sourdough. The next day, take the bowl out, let it come to room temperature for an hour, do one stretch and fold, and proceed with the pan-and-dimple steps. It is the move if you want to plan ahead.
Three most likely culprits. First, the dough was deflated during the transfer to the pan. Be very gentle when you pour it out, do not punch it down or stretch it aggressively. Second, the second proof in the pan was too short, the dough needs that 45 minutes to relax and fill up with bubbles again. Third, the dough was underproofed in the bulk ferment. If the gluten stretch test at 4 hours showed short, tearing strands instead of long elastic ones, give it more time before moving on.
Yes, and you should. Add them right after dimpling, before salting. Press cherry tomatoes cut-side down into the dimples so they roast as the focaccia bakes. Scatter thinly sliced red onion across the top. Pitted olives can be pressed into the dimples too. Fresh rosemary, thyme, and oregano all work. Whole cloves of garlic that have been gently smashed are incredible. Keep toppings light and well-spaced so the focaccia itself stays the main event.
Wrap loosely in a clean kitchen towel or store cut-side down on a board for up to 24 hours at room temperature. Do not refrigerate, the fridge stales bread fast. To reheat, pop it in a hot 200°C (390°F) oven for 4 to 6 minutes and the crust will come back to life. For longer storage, slice into portions and freeze in a zip bag, then reheat from frozen in the oven.
No, that is the entire point. This recipe has been designed for one bowl, one wooden spoon, and your wet hands. No mixer, no kneading hook, no flour-coated counter. The stretch and fold sessions do all the work that a mixer would do, spread out over four hours of mostly waiting.